Agile Wall Revit Collateral User Guide
THIS USER GUIDE HELPS TO ENSURE DESIGN, QUOTING AND INSTALLATION IS DONE ROBUSTLY AND EFFICIENTLY. TO STREAMLINE A.WORKS QUOTING AND INSTALLATION PROCESSES, WE ASK THAT YOU FORWARD YOUR REVIT MODEL TO THE DEALER, IN ORDER TO FACILITATE A THOROUGH REVIEW OF YOUR COMPONENT SELECTION.

Design (start here)
These steps allow you, as the designer, to have the complete range available within your project, with all options available for use.
Loading Families
As part of the A.WORKS agile wall system download, you have received the Agile Wall system showroom. This is a Revit file full of pre-made setups (Revit groups) as well as individual modules.
Open the showroom and copy-paste ALL pre-made setups into your project
This will bring in all:
• Agile wall pre-made setups as Revit named groups
• Individual components
• A.WORKS agile wall materials
Once groups are placed, you can edit the group and change:
• Configurations
• Skin and clip-on options
• Acoustic material/colour
• Add whiteboard tools (for presentation purposes)
Tip: Ungroup a pre-made setup when making a change to one placement (or regroup and give it another name), otherwise the change will affect all groups in your project with the same name.
The showroom contains all the individual families, but we recommend using the pre-made setups instead of starting from scratch!
When reloading individual modules into your project (i.e. you have placed the pre-made setups and purged your Revit file), “Edit” the module family in the showroom file, and then “Load into project”.
Parameters and tooltips
Where module selections are complex, the parameters have been split into sections and “How to Use....” parameters have been added: Hover over the parameters for tooltips.

Side I, Side II and the Access End symbols are on by default:
You can turn them off for presentation views (refer to the tips and tricks section).
If off, you can still view them in plan or 3d views by hovering over the module:

Power and data
The A.WORKS Agile Wall system can have CMS soft wiring systems added.
Power and data can be entered from below, from the side or from above with a power and data dropper by others. Power and data droppers can be turned on to posts and modules and change their height and material.
Note: Tools are not automatically scheduled and need to be ordered seperately.

Materials
The A.WORKS Revit families come with material parameters and pre-configured materials (refer to the technical specification for details).
All user selectable options within the families are instance parameters – select different A.WORKS materials to suit:

If you have followed the recommended loading process (refer previous section) all the A.WORKS materials will have been loaded into your project automatically.
Tip: Tip: If you only cut/ paste the individual modules into your project, you won’t be copying over all the different types within the families and they won’t be available to use.
2. Document
These documentation techniques are the easiest way for you, as the designer, to allow for robust pricing and ordering processes.
It will also ensure that all necessary information is available to the installers, allowing for all modules:
• To be located correctly
•To have the correct clip-ons, skins and acoustic materials installed onto the correct sides.
Schedules
Two schedules are included in the Revit showroom file. Both are necessary for pricing, ordering and documentation:
• A.WORKS Agile Wall Component BOM
• A.WORKS Agile Wall Component COUNT
Pricing
• Check the BOM schedule to ensure there are no invalid configurations: They will be highlighted as shown.
• If invalid configurations are found, select the schedule row, “Highlight in Model” and investigate/fix.
• Open the COUNT and BOM schedule view and export. This has all the information required for quick preliminary pricing from your supplier.
• Create a PDF of your floorplans showing all the A.WORKS modules. This allows your supplier to understand the context of the project and allows them to validate the base module numbers.
Setting-out and Annotating
This is helps the A.WORKS team to understand:
• Exact numbers of all components
• Where each module should be installed
• What specific-coloured skins and clip-ons go onto what side
• Document the set-out of the agile walls and include room numbers. By including the room numbers, the scheduled modules can be easily located on your plans by the installers.
• Ensure that side symbols and feet are turned on for all modules by editing their types and ensuring they are ticked.
• Copy/paste the “A.WORKS Agile Wall Tag” into your project.


Mark: Fill in the Instance Mark by clicking on the tag or filling in the “Mark” parameter of the module. Refer to the tips and tricks section for other methods.


Tag all the agile wall modules (including the posts) with the A.WORKS Agile Wall Tag. This tag will automatically fill in the “Model” abbreviation of the module.
Once set out, tagged and numbered, your documentation for the installers is complete.
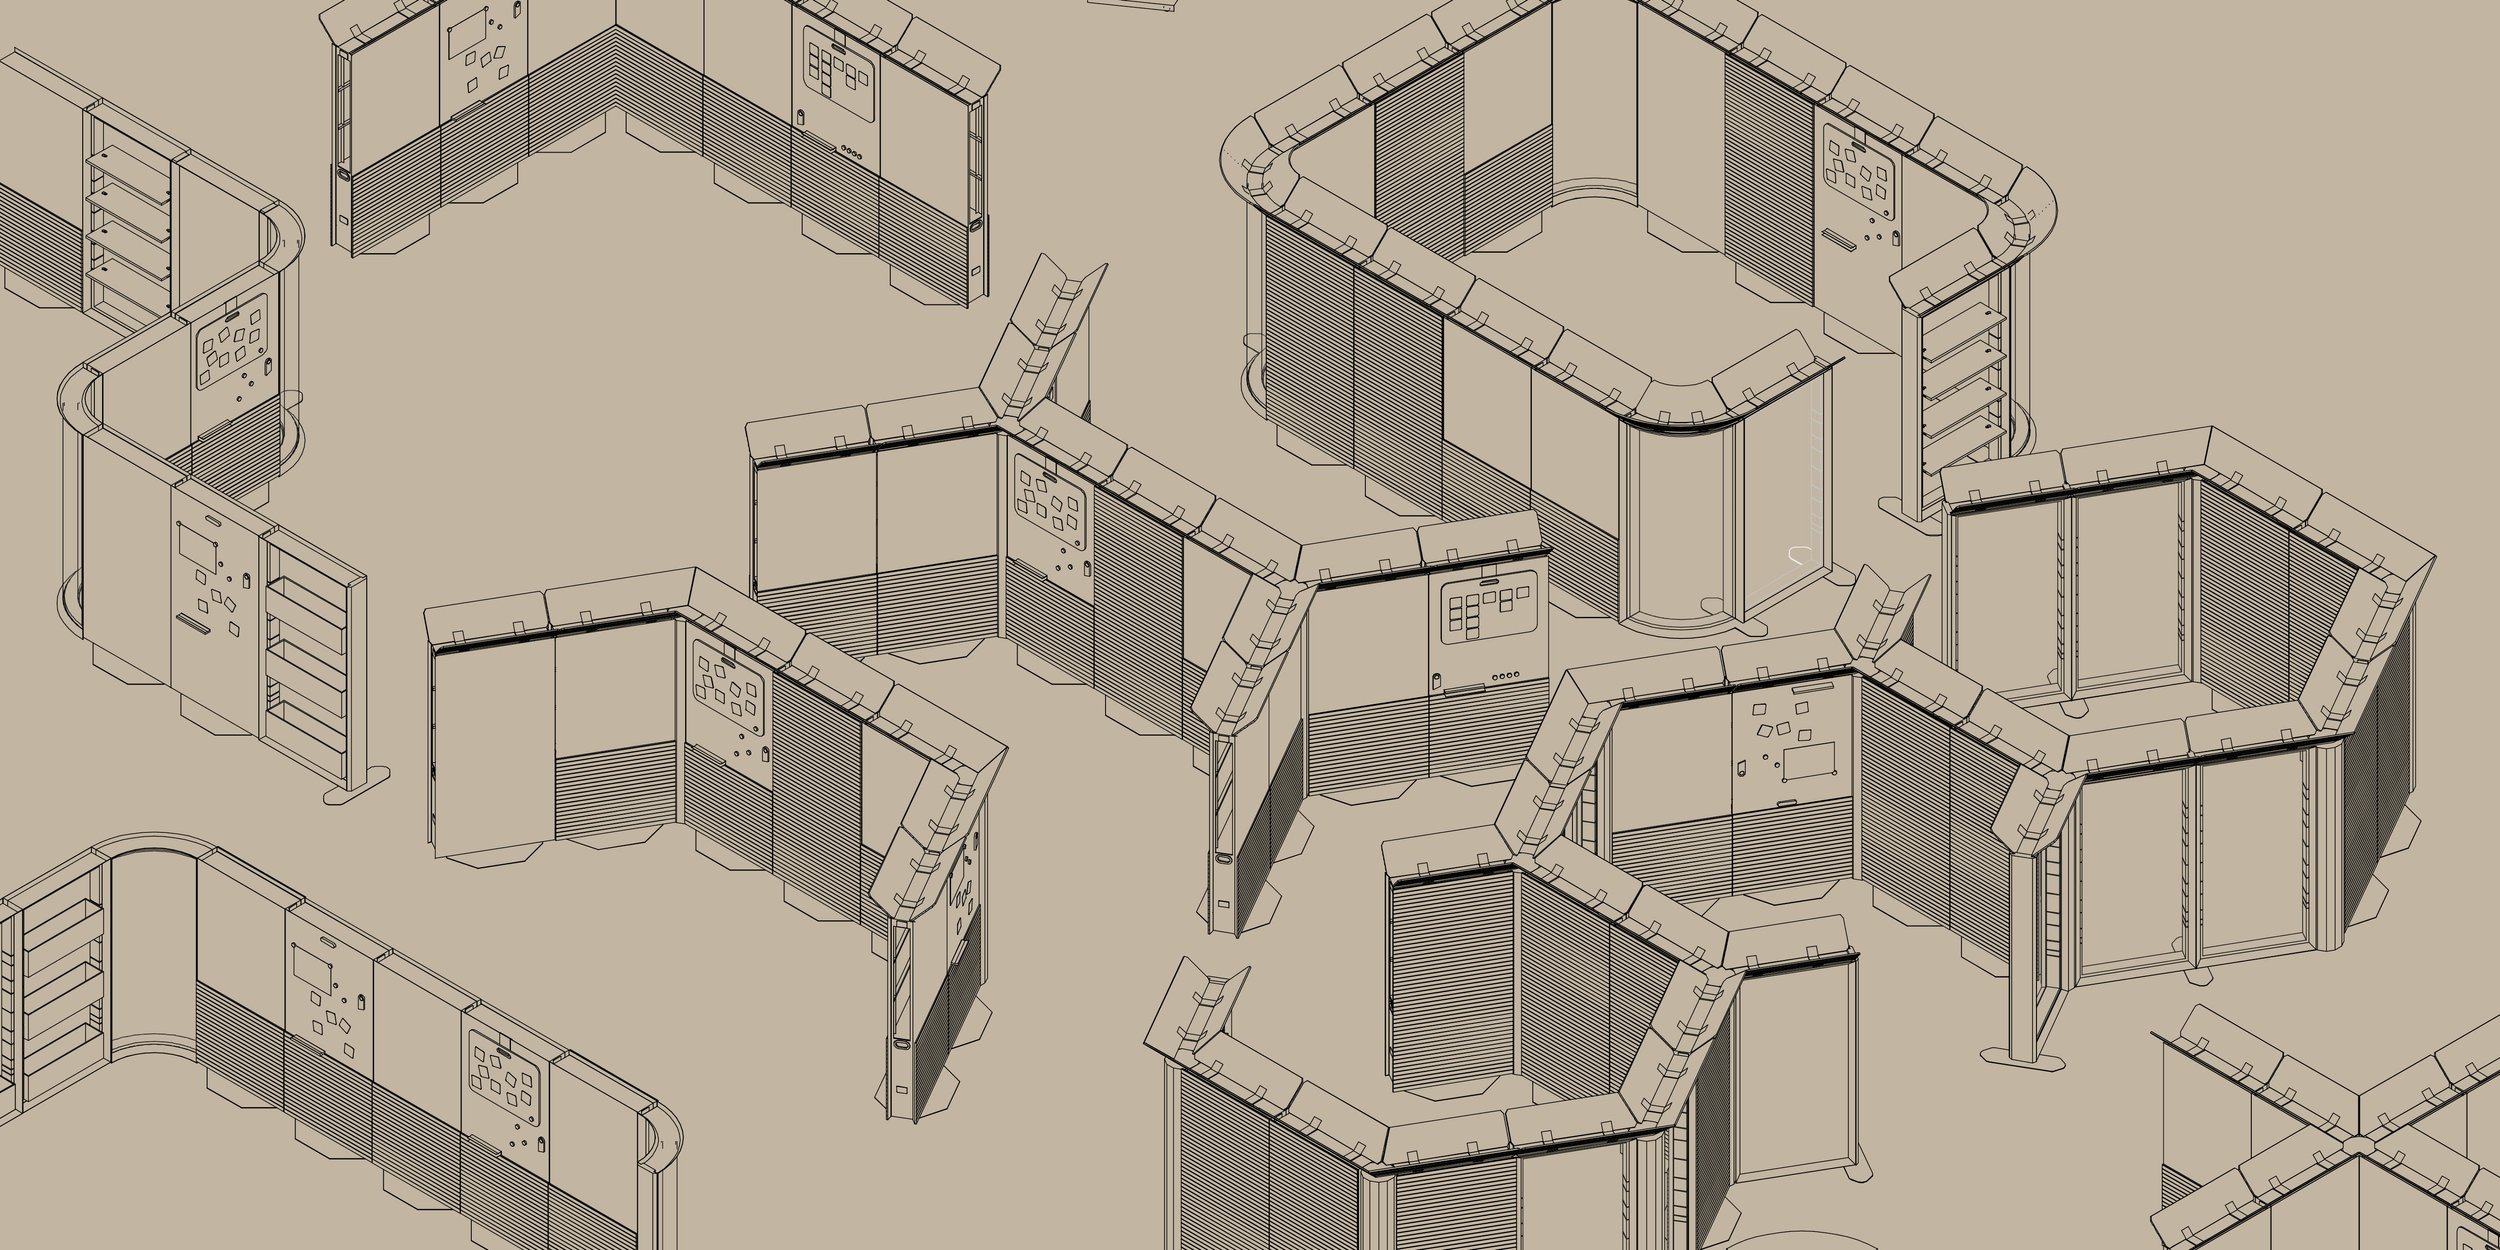
Example finished documentation for a cluster of agile walls:

Send the exported schedule, PDF, (and preferably your Revit model) to your supplier.
3. Tips, Tricks and Gotchas
• Placing a pre-made setup (or “Revit Group”)
All the premade setups are Revit groups, and by copy/pasting them into your project, they are now available by using the Architecture/Model Group/Place Model Group command:
• Turn off feet and/or side symbols for presentation plans
Every module has two type parameters (where relevant), which you can tick, or untick:


Turn parameters on and off globally (not available for Revit LT)
Tip: You can link these parameters through to the projects global parameters, allowing you to turn them on and off project wide (but they need to be turned on for documentation).

• Feet and side symbols not showing in plan
Even if you have ensured they are on and they are still not showing in plan, chances are they are being hidden by your floor finishes.
Either filter out your floor finishes in your furniture plan, or (recommended) lift all the modules up by the floor finish depth. This will ensure they look correct in 3d as well.


• Tagging modules
There are two ways to tag modules:
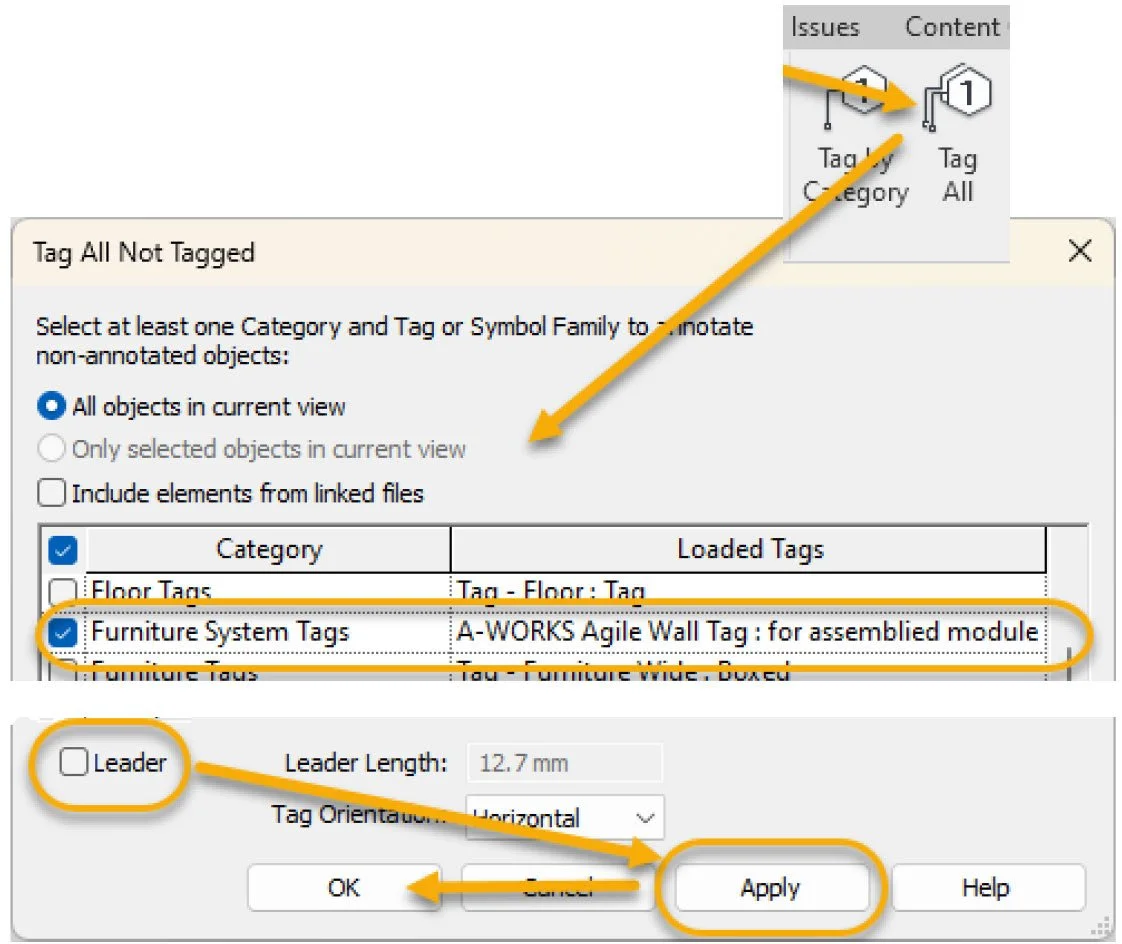
Tag All: (recommended). In your plan view, use the “Tag All” command and tag with the A.WORKS agile wall tag provided (refer previous section on how to copy this tag into your project).
a. “Tag All”
b. Select “Furniture Systems”
c. Ensure the right tag is being used
d. Turn off leaders
e. Click “Apply, then “OK”
Tag Individually: In your plan view, use the “Tag by Category” command and tag with the A.WORKS agile wall tag provided (refer previous section on how to copy this tag into your project).
a. “Tag by Category”
b. Orientate to the “Model”
c. Turn off leaders (optional, but faster to tag)

• Numbering modules
Manually: either slow-double click on the tag placed, and change the “Mark” value, or select the module and change it there (both ways do the same thing).
Install a third-party add-in: There are several third-party renumbering add-ins on the Autodesk App Store that fill this gap. We would recommend DiRoots One, a (currently free) add-in that has a great Re-ordering tool.
Just select the “Furniture Systems” category, follow your nose and ensure that you have selected the “Mark” field to be populated:

Select the schedules, copy and paste into your project.

4. Technical Specifications
Revit categories used
All agile wall components are within the “Furniture Systems” category. No new sub-categories are created.
Top acoustic wings “dashed lines” in plans are created and graphically controlled with the default “Hidden Lines” category:
Materials provided
All materials are copied automatically into your project ONLY if you copy all of the pre-made set-ups across using our recommended process.

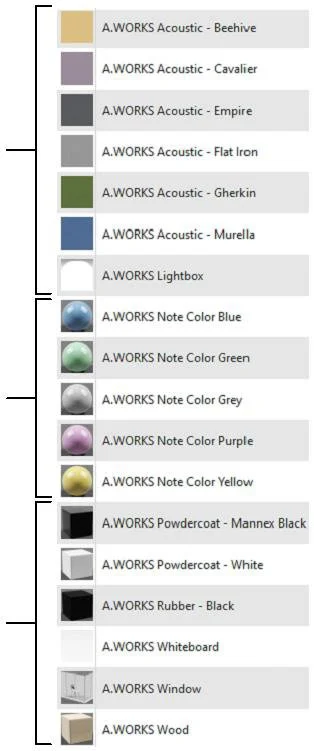
Acoustic materials: Standard options
Whiteboard Note tools: Standard options
Base materials: No user options